What Is Moisture Mapping? How It Guides Structural Drying and Supports Water-Damage Claims
- Revive Restoration
- Jul 31
- 14 min read
Published by Revive Restoration | Reviewed July 31, 2026
After a water loss, the visible puddle rarely tells the entire story. Water can travel beneath flooring, wick upward through drywall, move between rooms, enter wall cavities, and remain trapped inside materials that appear dry from the surface.
Moisture mapping is the process restoration professionals use to identify, measure, record, and monitor that hidden water. It turns a confusing water loss into a documented sequence: where the water originated, how far it traveled, which materials were affected, how the structure responded to drying, and whether those materials reached an acceptable drying goal.
A well-prepared moisture map serves four important purposes:
It documents the extent of the original water damage.
It provides a roadmap for extraction, demolition, and structural drying.
It records drying progress for the homeowner and insurance carrier.
It helps demonstrate when mitigation is complete and reconstruction can safely begin.
What Is Moisture Mapping?

A moisture map is a visual record showing where abnormal moisture was detected inside a building. It usually consists of a floor plan, room diagram, photograph, or digital sketch marked with specific measurement locations and their corresponding moisture readings.
The map distinguishes affected materials from comparable materials that were not affected by the water loss. It may document moisture in:
Drywall
Wood framing
Subflooring
Hardwood
Carpet and padding
Baseboards
Cabinets
Insulation
Concrete
Ceilings
Wall cavities
Crawlspace materials
Modern moisture maps often include color coding, symbols, photographs, material descriptions, equipment locations, and readings collected on multiple dates.
The ANSI/IICRC S500 Standard for Professional Water Damage Restoration recognizes moisture mapping as an important form of project documentation. The standard describes professional procedures for inspecting, evaluating, drying, and documenting water-damaged buildings. IICRC S500 Standard
A Moisture Map Is More Than a Picture
The word “map” can make the process sound like a single drawing produced at the beginning of a project. In practice, moisture mapping is an ongoing process.
A complete moisture record typically includes three stages:
Project stage | What the map should establish |
Initial inspection | Where the water traveled and which materials were affected |
Drying period | Whether moisture levels are decreasing and where drying remains incomplete |
Final inspection | Whether affected materials have reached the established drying goal |
The first map documents the loss. Subsequent maps document the response. The final map supports the decision to remove equipment, complete mitigation, and release the structure for repairs.
How Moisture Mapping Tells the Story of Water Damage
Water damage is an event that unfolds over time. A photograph can show a wet floor, but it cannot always explain how moisture moved beneath that floor, entered an adjoining wall, or reached the room below.
Moisture mapping helps reconstruct that story through measurable evidence.
It Identifies the Apparent Origin
The technician begins by locating the known or suspected source of the water. This might be:
A broken plumbing supply line
A failed water heater
An overflowing appliance
A toilet or drain backup
A leaking roof
A broken irrigation line
Exterior flooding
Wind-driven rain
The restoration company is not always responsible for determining the legal cause of the loss. However, identifying the apparent source or entry point helps the technician follow the path the water likely traveled.
It Traces Water Migration

Water does not remain where it first becomes visible. It follows gravity, penetrates porous materials, travels through seams, and can spread beneath flooring.
For example, a refrigerator supply-line leak may produce only a small visible puddle in the kitchen. Moisture readings may reveal that water also traveled:
Beneath the refrigerator
Under adjacent cabinets
Through the finished flooring
Into the wood subfloor
Behind the baseboard
Into the adjoining dining room
Down into the ceiling below
Without mapping, the project could be limited to the visibly wet area while leaving moisture trapped elsewhere.
It Establishes the Boundaries of the Loss
A restoration technician needs to know where abnormal moisture begins and ends. That requires checking the affected area and the immediately adjacent materials.
The resulting map creates a defensible boundary between:
Wet and unaffected drywall
Wet and unaffected flooring
Saturated and dry framing
Affected and unaffected rooms
Areas requiring removal and areas that may be dried in place
This boundary can reduce unnecessary demolition while helping prevent overlooked damage.
It Identifies the Materials Involved
Different building materials absorb, retain, and release water differently. Drywall may wick water vertically. Insulation can hold moisture inside a wall cavity. Hardwood may absorb moisture slowly and release it over an extended period. Cabinets and multilayer flooring assemblies may restrict evaporation.
A useful moisture map identifies not only where water was detected but also which materials were affected. The drying strategy should respond to the materials and assemblies involved, not merely the square footage of the room.
It Creates a Timeline
Repeated readings allow the restoration company to show how conditions changed.
Instead of simply stating that the structure was wet for four days, the record can show:
The original moisture level
The location of each reading
The date and time of subsequent measurements
Whether the reading increased, decreased, or remained unchanged
Equipment adjustments made in response
The final recorded condition
That timeline is what transforms isolated numbers into the story of the drying project.
Why Visual Inspection Is Not Enough
Building materials can look and feel dry while still containing elevated moisture.
Water may remain hidden:
Beneath vinyl plank or sheet flooring
Between a cabinet and the wall
Under carpet padding
Inside insulation
Behind baseboards
Beneath hardwood
In wall plates and framing
Between layers of subflooring
Above a finished ceiling
Inside a crawlspace
Touch is also an unreliable measurement method. Surface temperature, airflow, and material texture can make a damp surface feel dry or a dry surface feel cool and wet.
Professional moisture detection replaces guesswork with repeatable observations.
What Tools Are Used to Create a Moisture Map?
A professional assessment may use several types of instruments. No single tool answers every moisture question.
Non-Invasive Moisture Meters
Non-invasive meters scan beneath a surface without inserting pins. They are useful for quickly comparing a larger area and locating patterns that may warrant closer investigation.
These meters generally provide comparative or relative readings rather than a universal percentage of moisture for every building material. Metal, material density, surface conditions, and the layers beneath the tested surface can influence the result.
Pin-Type Moisture Meters
Pin meters use electrical resistance between two pins or probes. They are especially useful for evaluating wood and for confirming readings at specific locations.
Longer insulated probes may help technicians investigate moisture deeper inside certain assemblies. Pin meters make small penetrations, but they can provide information that a surface scan cannot.
Thermo-Hygrometers
A thermo-hygrometer measures environmental conditions such as temperature and relative humidity. These readings help the technician evaluate the air surrounding the wet materials and the performance of the drying system.
Atmospheric measurements do not replace structural moisture readings. A room can have relatively dry air while moisture remains trapped beneath flooring or inside a wall.
Thermal Imaging Cameras
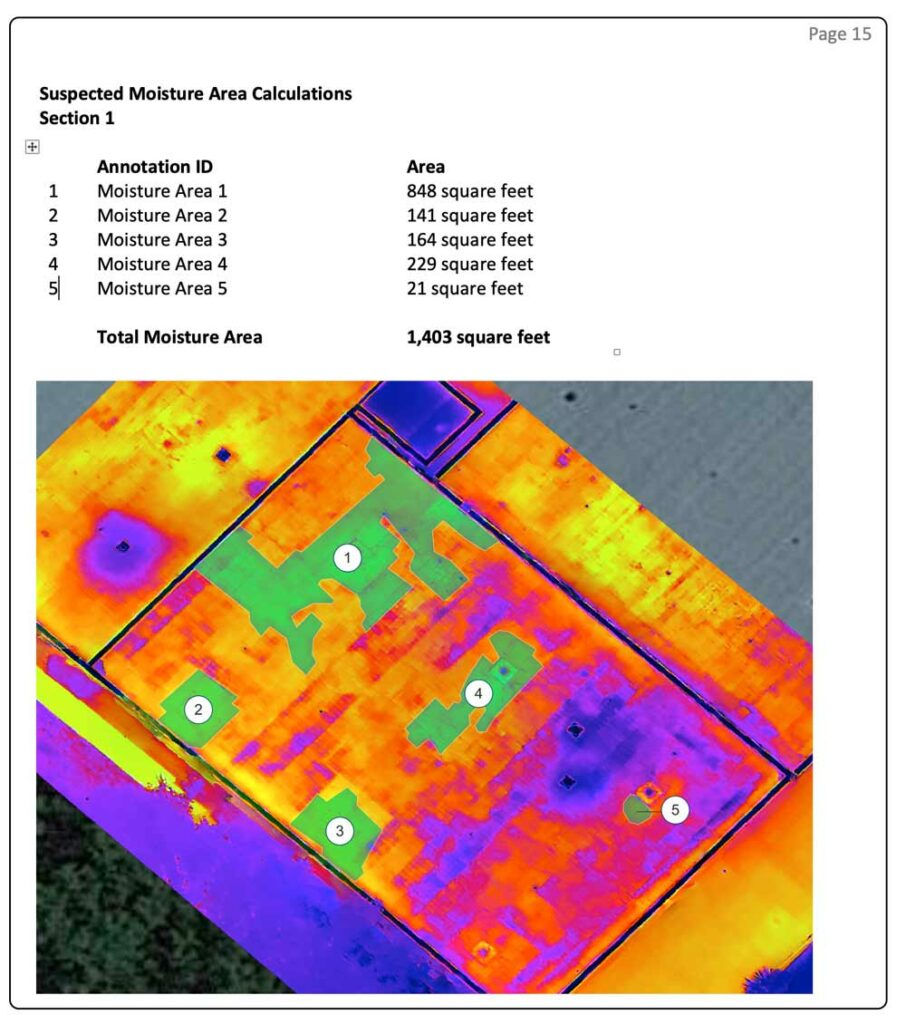
Thermal cameras detect differences in surface temperature. Evaporation, air leakage, missing insulation, plumbing temperatures, and wet materials can all produce visible temperature patterns.
However, thermal cameras do not directly see or measure water. FLIR explains that thermal imaging can identify patterns suggesting moisture, but the suspected area should be investigated with an appropriate moisture meter. FLIR thermal-imaging guidance
Thermal imaging is an excellent investigation tool, but a colorful thermal image by itself is not proof that a material is wet.
Digital Floor Plans and Mapping Software
Modern restoration platforms can associate moisture readings, photographs, material types, and equipment locations with a digital floor plan. Some systems allow readings from connected meters to be uploaded directly into the project file.
Digital tools make reports easier to read, but the quality of the map still depends on the technician’s inspection strategy, measurement technique, material knowledge, and consistency.
What Is a Dry Standard?
A moisture reading is not meaningful without something appropriate to compare it to.
A dry standard is a baseline established from comparable material that was not affected by the water loss. For example, a technician might compare wet framing in one room with similar framing in an unaffected portion of the building.
The goal is not necessarily to make every material read zero. Many building materials naturally contain some moisture, and readings can vary according to:
Material type
Wood species
Density
Temperature
Humidity
Meter type
Meter scale
Surface coatings
Depth of measurement
Building location
Normal seasonal conditions
The dry standard helps answer a more useful question: has the affected material returned to a condition reasonably comparable to similar unaffected material?
In some circumstances, the drying goal may be based on manufacturer requirements, industry guidance, scientific evaluation, or the requirements of a specialized material. The basis for the goal should be documented.
How Moisture Mapping Creates a Roadmap for Drying
Moisture mapping does not merely record the damage. It helps determine what the restoration company should do next.
1. It Guides Water Extraction
The map helps technicians locate areas where liquid water may remain beneath carpet, flooring, cabinets, or other materials. Extraction can then be concentrated where it will provide the greatest benefit.
2. It Informs Material-Removal Decisions
Some materials can be dried in place. Others may need to be removed because they are contaminated, damaged beyond repair, unable to dry efficiently, or restricting access to wet materials behind them.
Mapping helps the contractor distinguish between removal based on measurable conditions and removal based on assumption.
3. It Helps Determine Equipment Placement
Air movers and dehumidifiers should be placed to support a specific drying objective.
The map helps identify:
Which walls require airflow
Where evaporation is occurring
Which rooms contain wet materials
Where low-permeance finishes may restrict drying
Which enclosed spaces may require specialized access
Where dehumidification capacity is needed
Which assemblies require focused or contained drying
4. It Reveals Drying Problems
If readings are not decreasing as expected, the technician should investigate why.
Possible explanations include:
The water source is still active.
Moisture was missed inside an adjoining assembly.
Flooring or wall coverings are restricting evaporation.
Insufficient extraction was performed.
Airflow is not reaching the wet material.
Dehumidification is inadequate.
Equipment is turned off or operating improperly.
Environmental conditions are interfering with drying.
The measurement was taken at an inconsistent location.
The material requires a different drying method.
Without a map and consistent readings, a stalled area may not be recognized until equipment has already been removed.
5. It Helps Prevent Premature Equipment Removal
Drying equipment should not be removed solely because a predetermined number of days has passed.
Some structures dry quickly. Others require more time because of the materials, water volume, temperature, humidity, contamination, or construction method involved.
Final moisture readings help support the decision that drying equipment is no longer necessary.
Why Moisture Mapping Matters to an Insurance Claim

Insurance carriers need enough information to evaluate what happened, what work was reasonable, and whether the invoiced services correspond with the documented damage.
A moisture map can help answer several important claim questions:
Which rooms were affected?
Which materials were wet?
How far did the water migrate?
Why was extraction required?
Why were specific materials removed?
Why was drying equipment placed in certain locations?
Why did equipment remain for the documented period?
Were technicians monitoring the project?
Did the readings improve?
What evidence supports the claim that drying was complete?
Major insurers advise policyholders to photograph damage, take notes, mitigate further loss, retain invoices, and provide supporting information to the claim handler. State Farm property-claim guidance
A moisture map expands that documentation beyond what can be captured in ordinary photographs.
Is Moisture Mapping Required to Close an Insurance Claim?
There is no universal insurance rule stating that every water-damage claim must include one particular moisture-map format. Policy language, carrier procedures, claim size, water category, project complexity, and documentation requirements vary.
It is therefore more accurate to say that moisture mapping is important supporting documentation, not that a specific map is legally mandatory for every claim.
For a professional mitigation project, moisture documentation can be critical because it supports:
The affected scope
The necessity of drying services
Equipment quantity and placement
Monitoring visits
Material-removal decisions
The duration of drying
Completion of the mitigation phase
A moisture map does not determine insurance coverage. The insurer evaluates coverage according to the policy and cause of loss. It also does not, by itself, close the entire claim. Reconstruction, personal property, temporary living expenses, or other portions may remain open after mitigation ends.
What the final moisture documentation can do is help close the mitigation portion of the claim by showing that the documented materials reached the project’s drying goal and that the building was ready for the next phase.
The Three Records That Support Claim Completion
A strong mitigation file generally tells a beginning, middle, and end.
Initial Moisture Map: What Was Wet?
The initial map establishes the scope discovered during the inspection. It should correspond with photographs, notes, material descriptions, and the restoration estimate.
Monitoring Records: Was the Drying System Working?
Daily or periodic monitoring records show whether moisture levels and environmental conditions changed as expected. These readings also support equipment adjustments and continued equipment use.
Final Moisture Map: Did the Materials Reach the Goal?
The final map compares the ending readings with the documented dry standard or other drying goal. It provides evidence supporting equipment removal and transition to reconstruction.
Without the final readings, the record may show that a building was wet and that equipment was installed, but not that the drying objective was actually achieved.
The History of Moisture Mapping
Moisture mapping was not invented by one person on a single date. It developed gradually as moisture-measurement technology, building science, restorative drying, insurance documentation, and digital reporting came together.
Before Electronic Meters
Early methods of determining moisture content relied heavily on observation, touch, weight, and laboratory testing. One accurate method involved weighing a material, drying it in an oven, and comparing its dry weight with its original weight.
Although useful in scientific and manufacturing settings, laboratory methods were not practical for quickly evaluating walls and floors inside an occupied building.
The Development of Electrical Moisture Meters
Researchers discovered that the electrical properties of wood change according to its moisture content. The U.S. Forest Service reports that attempts to develop portable electrical resistance moisture meters began in the late 1920s. Commercial resistance meters appeared during the following decade. U.S. Forest Service history of electrical moisture meters
These instruments were initially associated primarily with lumber production, woodworking, and material-quality control. Their development created the technological foundation for portable field moisture testing.
For the first time, a technician could collect an immediate numerical reading without removing a large sample and sending it to a laboratory.
Moisture Measurement Enters Building Diagnostics
As portable meters became smaller and more practical, their use expanded into flooring installation, roofing, construction, building inspection, and restoration.
Technicians could now compare multiple locations across a wall or floor. Marking those readings on photographs or hand-drawn room diagrams was a natural next step. This practice allowed inspectors to visualize moisture distribution instead of treating each reading as an isolated number.
That combination—measurement plus location—is the essential idea behind moisture mapping.
The Rise of Professional Restorative Drying
The water-damage restoration industry became increasingly scientific during the late 20th century. Contractors began relying more heavily on psychrometry, controlled air movement, dehumidification, material science, and repeated moisture measurements.
In 1994, the IICRC published the first edition of its S500 Standard and Reference Guide for Professional Water Damage Restoration. The standard gave the industry a written framework for evaluating water damage, monitoring drying, taking moisture readings, and documenting project conditions.
The S500 later underwent several revisions. Its third edition, published in 2006, became the first version accredited through the American National Standards Institute process. The current 2021 edition continues to address inspection, moisture evaluation, drying, documentation, equipment, and project completion. IICRC standards information
The standardization of water restoration transformed moisture mapping from an optional sketch into an important component of professional project documentation.
The Digital-Mapping Era
Paper diagrams and handwritten moisture logs have increasingly been replaced by:
Digital floor plans
Mobile inspection applications
Bluetooth-connected moisture meters
Date- and time-stamped photographs
Cloud-based drying records
Color-coded moisture grids
Thermal images
Remote project review
Reports shared directly with adjusters
Modern systems can display the same test location across multiple monitoring dates, making it easier to recognize drying trends and identify stalled areas.
The tools have changed, but the underlying purpose remains the same: connect an accurate moisture reading to a specific material, location, and moment in time.
What a Professional Moisture Map Should Contain
The exact format may vary, but a useful moisture map should make it possible for another qualified person to understand the findings.
Depending on the project, documentation may include:
Property and claim information
Date and time of inspection
Apparent water source
Affected rooms
Room dimensions
Material descriptions
Measurement locations
Meter type or scale
Initial readings
Dry-standard readings
Monitoring readings
Final readings
Water migration boundaries
Equipment locations
Areas of material removal
Photographs
Thermal images when applicable
Notes explaining unusual conditions
Technician identification
A page filled with unexplained numbers is not an effective moisture map. The readings must be connected to identifiable locations and materials.
Common Moisture-Mapping Mistakes
Taking Too Few Readings
Checking only the center of the visibly wet area may miss moisture that traveled beneath finishes or into adjacent materials.
Failing to Establish a Dry Standard
A reading without an appropriate comparison may not show whether the material is abnormally wet or has reached its drying goal.
Moving Measurement Locations
Readings collected from different spots each day may create the appearance of progress or regression that does not reflect the actual material condition.
Treating Every Meter Scale as a Percentage
Many meters produce comparative readings on certain building materials. Those numbers should not automatically be described as literal moisture-content percentages.
Relying Only on Thermal Imaging
A thermal pattern identifies a temperature difference, not necessarily water. Meter confirmation is still needed.
Mapping Only at the Beginning
An initial map documents where the project started. It does not prove that the structure dried.
Removing Equipment Based Only on Time
A three-day equipment schedule is not a substitute for measurement. Drying decisions should respond to actual project conditions.
Failing to Explain Material Removal
If drywall, flooring, or cabinets are removed, the file should connect that decision to contamination, damage, restricted evaporation, accessibility, or documented moisture conditions.
What Homeowners Should Request
A homeowner can ask the restoration contractor to explain:
Which materials were tested
How the extent of damage was determined
What meters were used
Where the dry standard was established
How frequently the property will be monitored
What readings will determine completion
Whether moisture maps and drying records will be provided
How project information will be communicated to the insurance carrier
The homeowner should also retain copies of photographs, authorizations, estimates, invoices, moisture records, and insurance correspondence.
Frequently Asked Questions
Can moisture mapping find water behind walls?
Moisture mapping can identify readings and surface-temperature patterns suggesting hidden water. Pin probes, non-invasive meters, thermal imaging, inspection openings, or other methods may be needed to investigate a wall assembly.
Does a thermal camera measure moisture?
No. A thermal camera measures surface temperatures. Temperature patterns may help locate suspected moisture, but the finding should be confirmed with a moisture meter or another appropriate investigation method.
How often should moisture readings be taken?
Readings should be collected during the initial inspection, while drying is underway, and before the drying system is removed. The appropriate monitoring frequency depends on the project and restoration plan.
Does every wet material need to be removed?
No. Many materials can be dried in place when conditions permit. Removal decisions depend on contamination, material condition, accessibility, evaporation potential, cost, and whether the assembly can be dried safely and effectively.
What happens if moisture readings stop improving?
The technician should investigate the water source, extraction, airflow, dehumidification, material layers, equipment operation, environmental conditions, and the consistency of the measurement process.
Does moisture mapping guarantee insurance coverage?
No. Moisture mapping documents conditions and supports the scope of mitigation. Coverage is determined by the insurance carrier according to the policy and cause of loss.
When is a water-damage project considered dry?
A project is generally considered dry when the affected materials reach the established drying goal and the contractor has sufficient documented evidence to support completion. The goal should be based on comparable unaffected materials or another technically appropriate standard—not appearance alone.
The Bottom Line
Moisture mapping is the written and visual record of what water did inside a building.
It tells the beginning of the story by showing where water traveled. It documents the middle by showing how materials responded to extraction, airflow, and dehumidification. It supports the ending by demonstrating whether the affected materials reached an appropriate drying goal.
For the restoration contractor, it is a roadmap. For the homeowner, it is a record of what happened inside the property. For the insurance carrier, it is supporting evidence for the scope, duration, and completion of mitigation.
Most importantly, moisture mapping helps ensure that “looks dry” is not mistaken for “is dry.”
About Revive Restoration
Revive Restoration provides professional water-damage mitigation throughout Boise, Meridian, Nampa, and the Treasure Valley.
Our approach emphasizes careful moisture evaluation, documented structural drying, clear communication, and compassionate service. Trevor is an IICRC-certified Water Restoration Technician and a third-generation contractor.
Learn more about our professional water-damage restoration services, or call (208) 830-9765 when water damage affects your property.
Revive Restoration — Your Home’s First Responder.

Sources
This article provides general educational information. It does not determine insurance coverage, replace policy language, or provide engineering, legal, or claim-adjusting advice.


Comments